Parameter DB: Store and export EMOD parameter info#
ParamDB, the EMOD parameter database, is the source of truth for all EMOD parameter information (configuration, campaign, and demographics) for all simtypes, such as min/max/default values, extended descriptions, and JSON examples. By storing the parameter information in a database, it can easily be queried, updated, and replicated across dozens of documents while ensuring the consistency and accuracy of the content.
Note
You must be connected to the IDM VPN to access paramDB, and have permissions granted by the software engineering team.
Database navigation#

Tabs on the upper navigation bar of paramDB allow access to the campaign, configuration, and demographics parameters. Additional tabs show version information, a change log, and the parameter export page. Note, the campaign information can be viewed in two ways: by campaign class (first tab), or by individual parameters (second tab). Either view shows you which classes a parameter belongs to, and vice versa. You will primarily be working in the first four parameter tabs and the export tab.
Under the navigation tabs are drop-downs and check boxes to filter the results by branch and/or version. Note: Selecting a branch from the drop-down alone does NOT filter for that branch; you must also check the ‘Only this branch’ box. The same applies for Release Version. The ‘Branch’ field is included in the results, so you can confirm you are viewing the correct branch. The selected branch/version persists as you navigate between tabs. The data fields shown are specific to each tab, and cannot be modified.
After filtering for the correct branch/version and navigating to a parameter tab, use the text boxes at the top of the columns to filter the results and find the parameter/s of interest. Hint: If NO results are shown, try clicking the ‘Previous’ button at the bottom of the screen to ensure you are on the first page of results. Text box search can also be used within a campaign class to filter within the applicable parameters. Note: Deprecated parameters/campaigns WILL appear in search results; data in the database entry will indicate that it is deprecated.
A blue hyperlink in each parameter/class navigates you to a detail screen. Alternately, you can use the arrow next to a row to expand it and view the same details. If you are making changes on a page with multiple rows expanded, make sure you are saving/editing the correct parameter.
Workflow#

The typical EMOD documentation update workflow is shown above. Note, paramDB is used to to generate all CSV tables seen on the documentation pages. All other content, layout, inheritance, etc. within the docs is maintained/modified via the other files in the EMOD-docs repo. Both are used in conjunction to generate the pages our users see.
The sections below outline each workflow step in detail.
Guidance for common follow-up tasks (eg, related RST file updates) can be found in Additional changes (outside paramDB).
Note
ParamDB stores information for multiple documentation branches; ensure updates are made within the correct branch in both paramDB and github:
Simtype/s |
Branch |
|---|---|
HIV and malaria |
malaria-ongoing |
Generic and typhoid |
generic-ongoing |
TBHIV |
TBHIV-ongoing |
All others |
main |
When updating content that is NOT specific to a single branch, such as fixing a typo or expanding upon existing content, you must make these changes in all branches (all ongoing branches and main).
For more information on the EMOD documentation architecture and content reuse, see EMOD documentation.
Review the schema#
The schema is a critical source of truth when making updates to paramDB; review the schema for supported simtypes and current parameters to verify changes in the branches you are documenting.
Build the schema yourself (see Generate a list of all available parameters (a schema)) or download a schema from Bamboo. Note: We recommend using WinMerge to view the difference between past and current versions of the schema.
Add the new parameter description and keystring to the missing_XXX_params.rc file/s in DtkTrunk/utils; this is needed so the schema will compile correctly, but will NOT add the parameter to the documentation.
Once you’ve confirmed the changes to be made against the schema, move on to updating paramDB.
Update the database#
The database stores both information that is used to populate the documentation, and fields to help organize and designate how that information is exported. Fields appearing in the documentation are indicated as such below. Note: Not all fields appear on all parameter pages.
Open paramDB and navigate to the appropriate tab for the type of parameter you want to add or update. If updating an existing parameter, use the filter/search to navigate to it (see details in the Database navigation section above). Be sure you are opening the parameter in the correct class and simtype, if multiple results are returned.
To update existing parameters, select the correct parameter (hyperlink or expand arrow) and edit the information. To add a new parameter/class, click the green ‘Add Parameter/CampaignClass’ button and populate the information. You are encouraged to re-use wording and examples from related parameters to keep content consistent. Ensure any copied information is updated where necessary (eg. values in the JSON example, description details, etc).
Field
Restrictions
Details
Key String
Use the key string as it appears in the schema, if possible. Typically formatted as <ParamName>_DESC_TEXT.
Class
Campaign Classes only
The name of the campaign class.
Campaign Class
Campaign Class Parameters only
Select the Campaign Class that the parameter appears in from the drop-down. Auto-populated when updating existing parameters. If adding a new Class, do so first and add parameters to it after. Note: Existing parameters cannot be ‘moved’ from one class to another; deprecate from one and add to the other instead.
Parameter
The name of the parameter.
Branch
The branch you are adding/updating the parameter in. Only one branch can be selected at a time; use the ‘Save to all’ feature (button at bottom of page) to save completed updates to additional branches.
Release Version
Use the drop-down or gray ‘Choose Version From Git Log’ to select the relevant commit for this change. You can also type to add a value.
Deprecated Version
Used only when deprecating parameters. Type a value or select from the drop-down/GitLog for the commit relevant to the deprecation. Note: Deprecated parameters will still appear in the database, but will not be exported. Additional information on deprecation is in the sections below.
Class Type
Campaign Classes only
Select from current options: Intervention, Event Coordinator, or Campaign Event. (As of Jan-2024, Targeting Config classes are not yet included in paramDB; make changes directly to the targeting-config.rst).
Intervention Type
Campaign Classes only
Select Node or Individual.
Simulation Types
This determines which files the parameter is exported to. Note: You must select ALL simtype options in this field, not just ‘Generic’, if a parameter applies to all simtypes; there is no automatic inheritance.
Long Description
Appears in the documentation. Provide a clear and concise description of the parameter’s function. List any related or dependent parameters (format parameter names in bold), and provide any key guidance for the user. List all possible values for enums. Link to relevant documentation, for example, the Event list for a parameter that uses the built-in events.
Short Description
A simplified version of the long description, appearing in the schema.
Categories
Configuration tab only
This determines which CSV files the parameter is exported to. Select up to three categories (documentation pages) that this parameter will appear on. Note: These document categories are simply to help the user; there are no specific restrictions or requirements for which are selected.
Object Type
Appears in the documentation. The data type (float, string, etc.) Min, max, and default fields appear as applicable based on the object type selected. Note: We use ‘Boolean’ as the type for all parameters where users are selecting between a 0 and 1 value only (may indicate yes/no, true/false, on/off).
Default Value/Min/Max
Appears in the documentation. Review/use the values provided in the schema. Do not leave values blank. Helpful standards are as follows:
For JSON objects, enter ‘NA’ as the default.
For arrays, enter an empty array ([]) as the default.
For strings with no default value, enter an empty string (“”).
For arrays of floats/integers, Min and Max are the min/max value that can be used within the array.
For Booleans, enter 0 for Min, 1 for Max. Confirm the default against the schema.
Description
Optional description for the JSON example. Typically only needed if multiple examples are provided, for explaining the use case being demonstrated by the example.
JSON Example
Appears in the documentation. Provide a clear and simple JSON example showing how the parameter is formatted. Most examples will consist of a single parameter; include related parameters only if important for context, such as nested parameters within a JSON object. Otherwise avoid including additional parameters, as this leads to staleness/errors. Ensure sample values are relevant to the use case. Additional examples are optional.
Notes
Can be used to add internal notes on the database entry. NOT exported; seen only by other paramDB users.
Save your additions/changes using the Save button at the bottom of the page/window. You may cancel any changes by either refreshing the window or closing without saving. You may also need to close the window after saving a new parameter (does not auto-close after saving); an error will appear if you attempt to save/add twice.
If you have paramDB open in more than one tab/window, refresh to update the content.
After making your additions/updates, review any related parameters or campaigns where your new/updated parameter appears (JSON examples, references in definition) and make corresponding updates there as well. Be sure to save when finished.
Export the CSVs#
Navigate to the Export tab to generate CSV files from the database.
Select the parameter type/s you wish to export (top three check boxes). Note: All parameters of the selected type/s will be exported; there is no way to export individual or subsets of parameters.
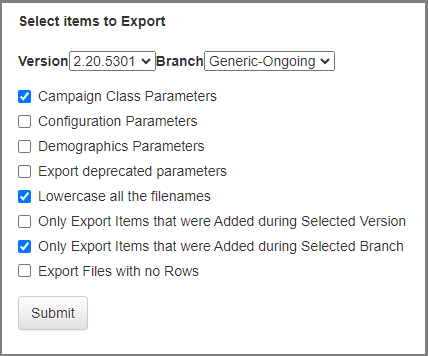
The image above shows typical export settings (parameter type selected will change depending on use case).
‘Lowercase all filenames’ helps ensure file paths are able to be built correctly.
‘Only Export Items that were Added during Selected Branch’ is critical to ONLY export parameters from the desired simtype/branch to the CSVs. If not selected, you will see duplicate entries in the CSV files (one from each branch containing that parameter).
Conversely, ‘Only Export Items that were Added during Selected Version’ should NOT generally be selected; keep unchecked to export the most recent version of all applicable parameters (typical use case).
‘Export Files with no Rows’ will cause a file to be generated for each simtype/page even if no data are present (eg, a Relationship demographics CSV for a vector-borne disease). There is no current use case for this function.
Note
The ‘Export deprecated parameters’ option does NOT prevent export of deprecated Campaign Class files; all Campaign Class CSVs, including those which are deprecated, will be exported. Please disregard the files for deprecated classes when copying to EMOD-docs/GitHub.
Once the appropriate export options have been selected, perform the following to export the CSVs.
Click ‘Submit’ and a zip file of the applicable CSVs will be exported to your Downloads folder.
Extract the compressed files to a location of your choosing.
Optional: Review a sample CSV to ensure the data are as expected (no duplicates, formatting issues, etc.). DO NOT make any manual changes to the CSVs after export; if errors are found, make changes in paramDB and re-export until the resulting data are accurate. This review will also be performed in more detail while testing the build.
Ensure you are in an appropriate local branch to make changes to your cloned EMOD-docs CSV folder. (GitHub URL is here.)
Copy the applicable CSV files into local EMOD-docs/emod/csv, making sure to delete/overwrite the files you are replacing.
Test the build#
Ensure any additional changes to the branch are saved (guidance in the section below), then test the build using Sphinx (‘make html’ command, from an appropriate simtype folder). See Sphinx: Build the HTML output for additional details on installing and using Sphinx.
Verify that all EMOD docsets build without error. See Sphinx build troubleshooting for help with common build errors.
Open a test build html file from your local _build/html folder in the EMOD-docs repo. Review the updates/additions to ensure they are accurate and formatted correctly. If errors are found, make changes in paramDB and re-export/re-build until the resulting documentation is correct. DO NOT make manual changes in the CSV files.
Once you’ve confirmed your updates are successful, commit the new CSVs to GitHub for review/approval.
Run get_params.py to pull the long descriptions into the config or campaign RC files. For example, to generate new config_params.rc and iv_params.rc for version 2.21, you would enter the following:
get_params.py --config -o config_params.rc --old-naming -v 2.21
get_params.py --iv -o iv_params.rc --old-naming -v 2.21
Note
The get_params.py script queries the API for the parameter database. And, without adding the
--old-namingflag, the script prepends the campaign class name for the_DESC_TEXTname. For example, CalendarEventCoordinator_Node_Property_Restrictions_DESC_TEXT and TriggeredEventCoordinator_Node_Property_Restrictions_DESC_TEXT, etc.Remove the temporary description and keystring from the missing_params.rc file.
Additional changes (outside paramDB)#
As shown in the Workflow, additional edits to the RST files (docs pages), full JSON examples, and others may be needed when updating EMOD parameters. Basic steps for some common tasks are provided below. See Get started and the reStructuredText primer for more detailed information on creating and updating docs content.
Deprecate a campaign class#
Open the class in paramDB and input a ‘Deprecated Version’ value. This will flag the class as deprecated. (As noted, a CSV for this class will still be generated when exporting the Campaign parameters, but it can be disregarded.)
Delete the corresponding CSV file from the EMOD-docs/emod/csv folder.
Using the simtypes listed in paramDB as a guide, identify all applicable RST docs pages for the campaign class in the EMOD-docs file structure. For each applicable simtype:
Delete the RST file for the deprecated campaign class.
Delete the table of contents (TOC) entry for that page from the main campaign-type page. File names are as follows:
parameter-campaign-event-coordinators.rst
parameter-campaign-node-interventions.rst
parameter-campaign-individual-interventions.rst
parameter-campaign-waningeffects.rst
parameter-campaign-targeting-config.rst
Perform all review, test, and commit steps as above.
Add a campaign class#
After adding the campaign class and all applicable parameters/information to paramDB per the main Workflow, perform the following:
Create a JSON example for the campaign class and save it to the EMOD-docs/emod/json folder, following the naming convention of the other JSON examples.
Create a new RST file in the applicable simtype folder, following the naming convention of other pages in that class/simtype.
Using an existing campaign class page as a template, populate the new RST file with appropriate information for the new campaign class:
introduction paragraph
CSV parameter table
JSON example
all standardized notes/warnings
Add a TOC entry for the new page to the main campaign-type page (file names bulleted above), in alphabetical order, using the existing link format.
Perform all review, test, and commit steps as above.
If the class is applicable to multiple/all simtypes:
Perform the above steps in the primary simtype’s folder (typically “generic”, but others can be used as applicable).
Repeat the above steps for all other applicable simtype, EXCEPT only populate the RST with an
includedirective to the primary document:.. include:: ../generic/<doc-name>.rst. If there is content relevant only to the secondary simtypes (for example, the class is present in vector and inherited in malaria but contains malaria-specific functionality), include that content after theincludedirective.