Install EMOD on Windows
To install EMOD on Windows computers, follow the steps below. You will install the pre-built Eradication.exe and all software necessary to run simulations locally. Optionally, you can install Python virtual environments, software to plot the output of simulations, and EMOD input files for various regions.
The EMOD executable (Eradication.exe) is tested using Windows 10, Windows Server 12, and Windows HPC Server 12 (64-bit). Windows HPC Server is used for testing remote simulations on a high-performance computing (HPC) cluster and the other Windows operating systems are used to test local simulations.
Note
If you want to download and modify the EMOD source code and build the Eradication.exe yourself, see EMOD source code installation.
Install EMOD
Install the Microsoft HPC Pack 2012 Client Utilities Redistributable Package (64-bit). See http://www.microsoft.com/en-us/download/details.aspx?id=36044 for instructions.
Install the Microsoft MPI v8. See https://www.microsoft.com/en-us/download/details.aspx?id=54607 for instructions, being sure to run the MSMpiSetup.exe file.
Install the Microsoft Visual C++ 2015 Redistributable (64-bit). See https://www.microsoft.com/en-us/download/details.aspx?id=53840 for instructions.
On GitHub on the EMOD releases page, download the EMOD executable (Eradication.exe). Save to a local drive, such as the desktop.
Warning
Double-clicking Eradication.exe will not run the EMOD software or launch an installer. You must run EMOD from the command line or a script. See Running a simulation for more information.
(Optional) Install plotting software
None of the following plotting software is required to run simulations with EMOD, but it is useful for creating graphs from and evaluating the model output. In addition, EMOD provides many Python scripts for analyzing data.
Note
IDM does not provide support or guarantees for any third-party software, even software that we recommend you install. Send feedback if you encounter any issues, but any support must come from the makers of those software packages and their user communities.
Python and Python packages
Python is required to install many of the software packages described below.
In a web browser, go to https://www.python.org/downloads/release/python-366/ to install Python 3.6.
Scroll down and download one of the x86-64 bit installers (you may use the executable installer or the web-based installer.)
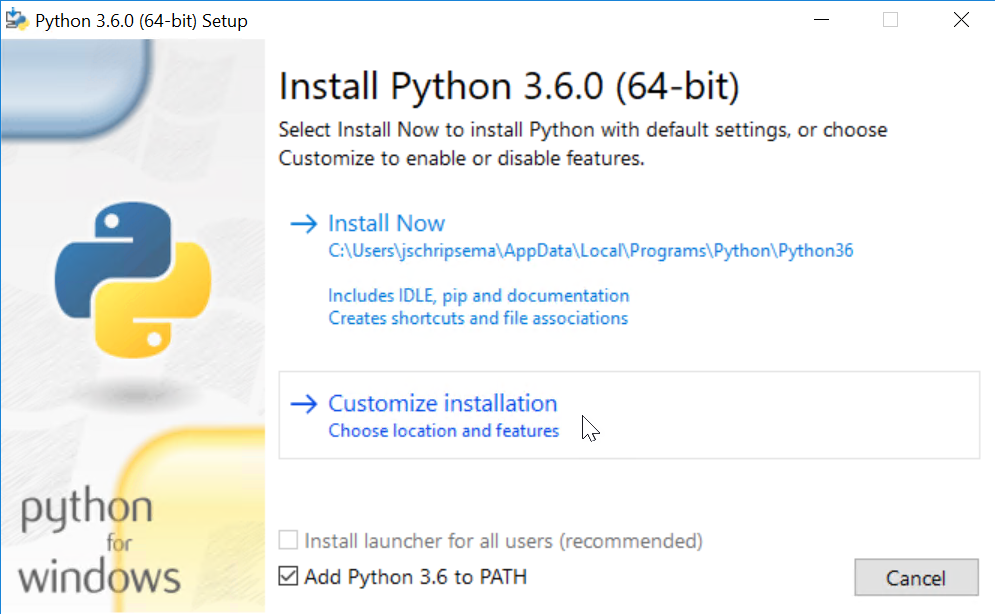
Double-click the executable file and, in the installer window, select the Add Python 3.6 to PATH checkbox and click Customize installation.
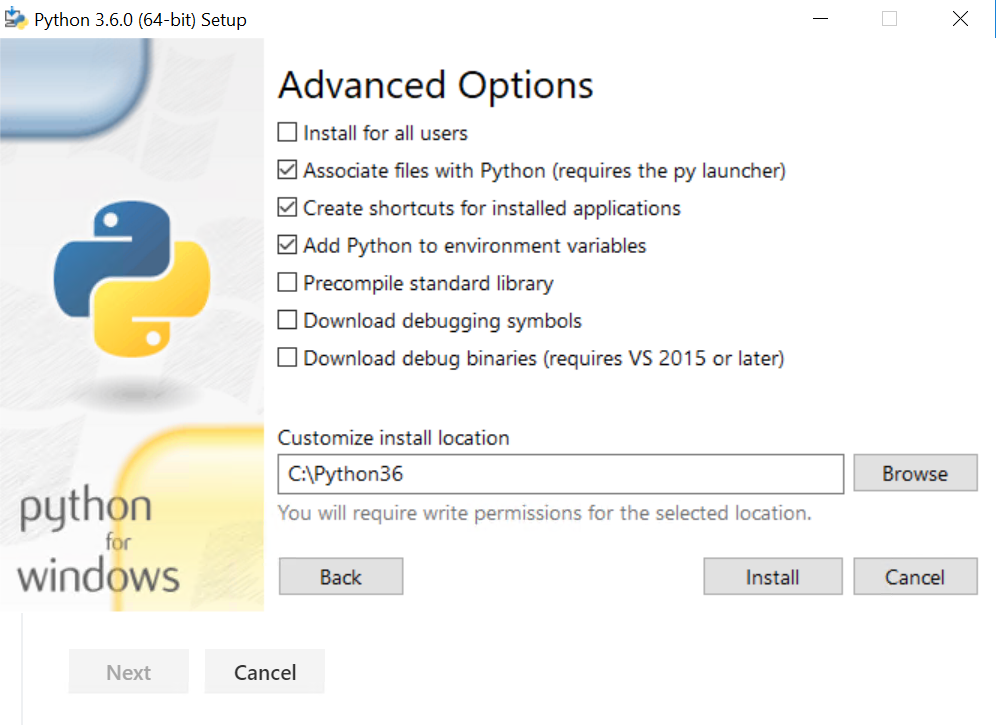
On the Optional Features window that opens, leave all default values selected and click Next. The Python package manager, pip, is used to install other Python packages.
If you are running EMOD locally, IDM recommends that you select the Advanced Options window to customize the installation directory to “C:\Python36”.
You may install Python in another location, but the Python plotting scripts included in the EMODScenarios folder assume that Python is installed directly under the C: drive. If you install it elsewhere, you may need to edit those scripts when using the scenarios to learn about EMOD functionality.
Click Install. When installation is complete, click Close.
To verify installation, open a Command Prompt window and type the following:
python --version
Python virtual environments
You may want to install Python virtual environments to isolate your Python environments from one another and give you the option to run multiple versions of Python on the same computer. When using a virtual environment, you can indicate the version of Python you want to use and the packages you want to install, which will remain separate from other Python environments.
To install virtual environments, open a Command Prompt window and enter the following:
pip install virtualenv
Navigate to the location where you want to create the virtual environment directory and enter the following to create a environment called “idm”:
virtualenv idm
If Python 3.6 is not your default interpreter, append the path to your Python 3.6 installation directory in the format:
virtualenv idm -p C://Python36/python.exe
To activate the virtual environment, enter the following:
idm/Scripts/activate
Verify that the command prompt displays “idm” at the beginning, which indicates that you are in the idm virtual environment. For example:
(idm) my-computer:idm
To verify which version of Python the environment is using, enter the following:
python --version
When you are done working in this virtual environment, deactivate the environment. The environment will be saved and you can reactivate it at any time. To deactivate, enter the following:
idm/Scripts/deactivate
NumPy
We recommended that you download some of the NumPy Python package from http://www.lfd.uci.edu/~gohlke/pythonlibs, a page compiled by Christoph Gohlke, University of California, Irvine. The libraries there include linear algebra packages that are not included by default with the standard Windows packages. They are compiled Windows binaries, including the 64-bit versions required by EMOD. The naming convention used lists the Python version after “cp”, for example “cp36-cp36m”, and the Windows bit version after “win”, for example “win_amd64”.
The NumPy package adds support for large, multi-dimensional arrays and matrices to Python.
Go to http://www.lfd.uci.edu/~gohlke/pythonlibs/#numpy and select the WHL file for NumPy 1.16.2 (64-bit) that is compatible with Python 3.6.
Save the file to your Python installation directory.
Open a Command Prompt window and navigate to the Python installation directory, then enter the following, substituting the name of the specific NumPy WHL file you downloaded:
pip install numpy-1.x.x+mkl-cp36-cp36m-win_amd64.whl
Python packages
The Python packages dateutil, six, and pyparsing provide text parsing and datetime functionality.
Note
Be sure NumPy is installed before you install Matplotlib.
Open a Command Prompt window and enter the following:
pip install python-dateutil
pip install pyparsing
pip install matplotlib
pip install future
R
R is a free software environment for statistical computing and graphics.
Go to https://www.r-project.org/ and install R 3.2.0 (64-bit).
MATLAB
MATLAB is a high-level language and interactive environment for numerical computation, visualization, and programming. The MATLAB Statistics and Machine Learning Toolbox™ provides functions and applications to describe, analyze and model data using statistics and machine learning algorithms.
Go to http://www.mathworks.com/products/matlab/ and install MATLAB R2015a.
If desired, go to https://www.mathworks.com/products/statistics.html and install the MATLAB Statistics and Machine Learning Toolbox™ R2015a.
(Optional) Download input files
IDM provides input files that describe the demographics, migration patterns, and climate of many different locations across the world. You can download these files from the EMOD-InputData repository, which uses large file storage (LFS) to manage the binaries and large JSON (JavaScript Object Notation) files. A standard Git clone of the repository will only retrieve the metadata for these files managed with LFS. To retrieve the actual data, follow the steps below.
Install the Git LFS plugin, if it is not already installed.
For Windows users, download the plugin from https://git-lfs.github.com.
For CentOS users, the plugin is included with the PrepareLinuxEnvironment.sh script.
Using a Git client or Command Prompt window, clone the input data repository to retrieve the metadata:
git clone https://github.com/InstituteforDiseaseModeling/EMOD-InputData.git
Navigate to the directory where you downloaded the metadata for the input files.
Download the actual data on your local machine:
git lfs fetch
Replace the metadata in the files with the actual data:
git lfs checkout