Calibration Workflow for LASER Models
This guide explains how to calibrate a LASER model using Optuna. Calibration is the process of adjusting model parameters (e.g., transmission rate, R0) so that simulation outputs match reference data (e.g., case counts, prevalence curves). This document assumes you’ve already built and tested a working LASER model.
Prerequisites
A functioning, tested LASER model.
Python environment with laser-core, optuna, pandas, and numpy installed.
(Optional) Docker Desktop installed if running distributed calibration.
Simple Local Calibration
Expose Parameters in Your Model Ensure your LASER model can load and apply parameters you wish to calibrate. These are typically passed through a params dictionary or a PropertySet and might include:
Basic reproduction number (R0)
Duration of infection
Seeding prevalence
Write Post-Processing Code Modify your model to save key outputs (e.g., number of infected individuals over time) to a CSV file. For example, use:
save_results_to_csv(sim.results)
This CSV will be used later by the objective function.
Create the Objective Function Write a Python script, usually named objective.py, containing a function like this:
def objective(trial):
    # Load trial parameters
    R0 = trial.suggest_float("R0", 1.0, 3.5)

    # Run model (via subprocess, or function call)
    run_model(R0)

    # Load model output and reference data
    model_df = pd.read_csv("output.csv")
    ref_df = pd.read_csv("reference.csv")

    # Compare and return score
    error = np.mean((model_df["I"] - ref_df["I"])**2)
    return error
Tip: You can write unit tests for your objective function by mocking model outputs.
Test Objective Function Standalone Before integrating with Optuna, run your objective function directly to ensure it works:
from objective import objective
from optuna.trial import FixedTrial

score = objective(FixedTrial({"R0": 2.5}))
print(f"Test score: {score}")
Expected Result: A numeric score. If it crashes, check CSV paths and data types.
Run Simple Calibration (SQLite, No Docker) Use the calib/worker.py helper to run a local test study with a small number of trials.
Linux/macOS (Bash or similar):
export STORAGE_URL=sqlite:///example.db && python3 calib/worker.py --num-trials=10
Windows (PowerShell):
$env:STORAGE_URL="sqlite:///example.db"; python calib/worker.py --num-trials=10
This is helpful for debugging. Consider running a scaled-down version of your model to save time.
Local Dockerized Calibration
Dockerize Your Model and Objective Use the provided Dockerfile to build a container that includes both your model and objective function. Do this from the main directory.
docker build . -f calib/Dockerfile -t idm-docker-staging.packages.idmod.org/laser/laser-polio:latest
Create Docker Network You’ll need a shared network so your workers and database container can communicate:
docker network create optuna-network
Launch MySQL Database Container
docker run -d --name optuna-mysql --network optuna-network -p 3306:3306 \
  -e MYSQL_ALLOW_EMPTY_PASSWORD=yes \
  -e MYSQL_DATABASE=optuna_db mysql:latest
Launch Calibration Worker
docker run --rm --name calib_worker --network optuna-network \
  -e STORAGE_URL="mysql://root@optuna-mysql:3306/optuna_db" \
  idm-docker-staging.packages.idmod.org/laser/laser-polio:latest \
  --study-name test_polio_calib --num-trials 1
If that works, you can change the study name or number of trials.
Troubleshooting: If this fails, try running the worker interactively and debug inside:
docker run -it --network optuna-network --entrypoint /bin/bash idm-docker-staging.packages.idmod.org/laser/laser-polio:latest
Monitor Calibration Progress
Use Optuna CLI. You should be able to pip install optuna.
optuna trials \
  --study-name=test_polio_calib \
  --storage "mysql+pymysql://root:@localhost:3306/optuna_db"

optuna best-trial \
  --study-name=test_polio_calib \
  --storage "mysql+pymysql://root:@localhost:3306/optuna_db"
Cloud Calibration
Push Docker Image to Registry
If you’ve built a new docker image, you’ll want to push it so it’s available to AKS.
docker push idm-docker-staging.packages.idmod.org/laser/laser-polio:latest
Cloud Deployment
This step assumes you have secured access to an Azure Kubernetes Service (AKS) cluster. You may need to obtain or generate a new kube config file. Detailed instructions for that are not included here. This step assumes the cluster corresponding to your config is up and accessible.
cd calib/cloud
Edit config file. Edit cloud_calib_config.py to set the storage_url to:
"mysql+pymysql://optuna:superSecretPassword@localhost:3306/optunaDatabase"And set the study name and number of trials per your preference. Detailed documentation of the other parameters is not included here.
Launch multiple workers:
python3 run_calib_workers.py
View Final Results
Forward port to local machine. Note that is the first instruction to rely on installing kubectl. Open a bash shell if necessary.
kubectl port-forward mysql-0 3306:3306 &
Use Optuna CLI to check results:
optuna trials \
  --study-name=test_polio_calib \
  --storage "mysql+pymysql://optuna:superSecretPassword@localhost:3306/optunaDatabase"

optuna best-trial \
  --study-name=test_polio_calib \
  --storage "mysql+pymysql://optuna:superSecretPassword@localhost:3306/optunaDatabase"
Generate a report on disk about the study (can be run during study or at end).
python3 report_calib_aks.pyLaunch Optuna Dashboard
python -c "import optuna_dashboard; optuna_dashboard.run_server('mysql+pymysql://optuna:[email protected]:3306/optunaDatabase')"
Expected Output
A best-fit parameter set (R0, etc.) that minimizes error.
An Optuna study saved in MySQL or SQLite.
Log files or CSVs showing score over time.
Error Handling
Missing CSVs: Ensure output files are written by the model before scoring.
Model crashes: Check Docker logs (docker logs <container>) or run interactively.
Database connection errors: Confirm Docker network and container health. Ensure MySQL is listening on the expected port.
Iterative Development Cycle
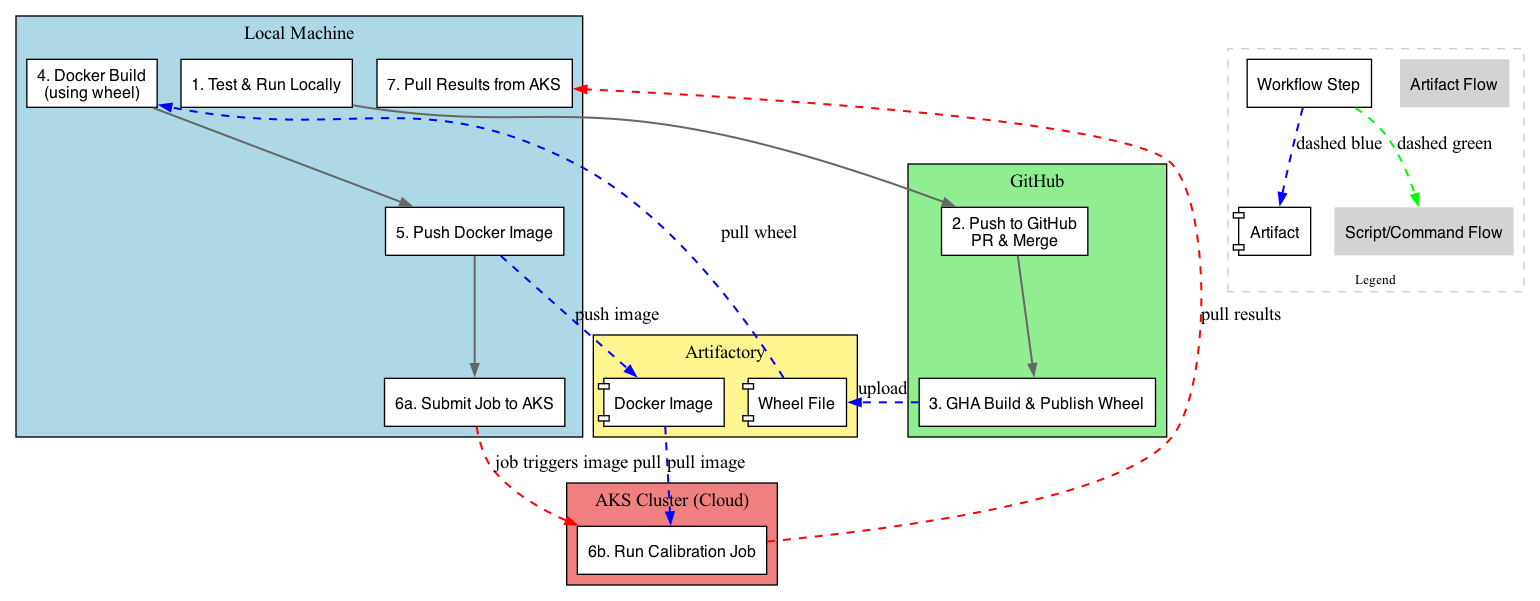
Workflow Steps
Test & Run Locally
Test your model and calibration code locally before committing or containerizing.
python3 calibrate.py --study-name=test_local --num-trials=3
Push to GitHub
Push your changes to GitHub and submit a pull request for review. Once approved, merge to the default branch (e.g. main or develop).
GHA Build & Publish Wheel
GitHub Actions (GHA) will automatically build a Python wheel and publish it to your private PyPI/Artifactory.
Docker Build (using wheel)
On your local machine, build a Docker image using the freshly published wheel.
docker build -t idm-docker-staging.packages.idmod.org/laser/laser-polio:latest .
Push Docker Image
Push the built image to your container registry so it’s accessible from AKS.
docker push idm-docker-staging.packages.idmod.org/laser/laser-polio:latest
Submit and Run Calibration Job
Submit Job to AKS:
Launch your Kubernetes job to run calibration using the new image.
python3 run_calib_workers.pyRun Calibration Job:
The cluster pulls the image and executes the calibration job according to the job spec.
Pull Results from AKS
See above.
Notes
If port 8080 is already in use when launching the dashboard, use port=8081 or another free port.
Make sure your port-forwarding process is active whenever running Optuna CLI or dashboard from your local machine.
Each iteration through this workflow can test new parameters, updated logic, or bug fixes — without affecting production deployments.
Next Steps
Once you’ve completed calibration: - Analyze the best-fit parameters. - Re-run your model using the optimal settings. - Generate plots or reports to summarize calibration quality.