T10 - Tips and tricks#
This tutorial contains suggestions that aren’t essential to follow, but which may make your life easier.
Click here to open an interactive version of this notebook.
Getting help#
In addition to the docs (yes, you’re reading them as we speak, well done), you can get help within Covasim. You can even search for a string in Covasim’s source code. Curious to know where binomial distributions are used? You can do:
[1]:
import covasim as cv
cv.options(jupyter=True)
cv.help('binomial', source=True)
Covasim 3.1.7 (2026-02-18) — © 2020-2026 by IDM
Found 16 matches for "binomial" among 113 available functions:
                     People:  6 matches
               binomial_arr:  3 matches
            binomial_filter:  3 matches
            contact_tracing:  1 matches
  historical_vaccinate_prob:  3 matches
            historical_wave:  1 matches
                  make_pars:  1 matches
       make_random_contacts:  2 matches
               make_randpop:  1 matches
                 n_binomial:  3 matches
             n_neg_binomial:  5 matches
                     sample:  5 matches
             simple_vaccine:  1 matches
                  test_prob:  1 matches
              vaccinate_num:  1 matches
             vaccinate_prob:  1 matches
You can also get a detailed view of the options with cv.options.help(detailed=True), or more concise ones with cv.options.help() or cv.options.disp():
[2]:
cv.options.disp()
Covasim options (see also cv.options.help()):
         verbose: 0.1
           style: 'covasim'
             dpi: 100
            font: ['sans-serif']
        fontsize: 10
     interactive: True
         jupyter: True
            show: 1
           close: 0
       returnfig: False
         backend: 'module://matplotlib_inline.backend_inline'
              rc: {'axes.axisbelow': True,
                   'axes.spines.right': False,
                   'axes.spines.top': False,
                   'figure.facecolor': 'white',
                   'font.family': 'Mulish',
                   'legend.frameon': False,
                   'axes.facecolor': '#f2f2ff',
                   'axes.grid': True,
                   'grid.color': 'white',
                   'grid.linewidth': 1}
        warnings: 'warn'
             sep: ','
       precision: 32
  numba_parallel: 'none'
     numba_cache: True
Versioning#
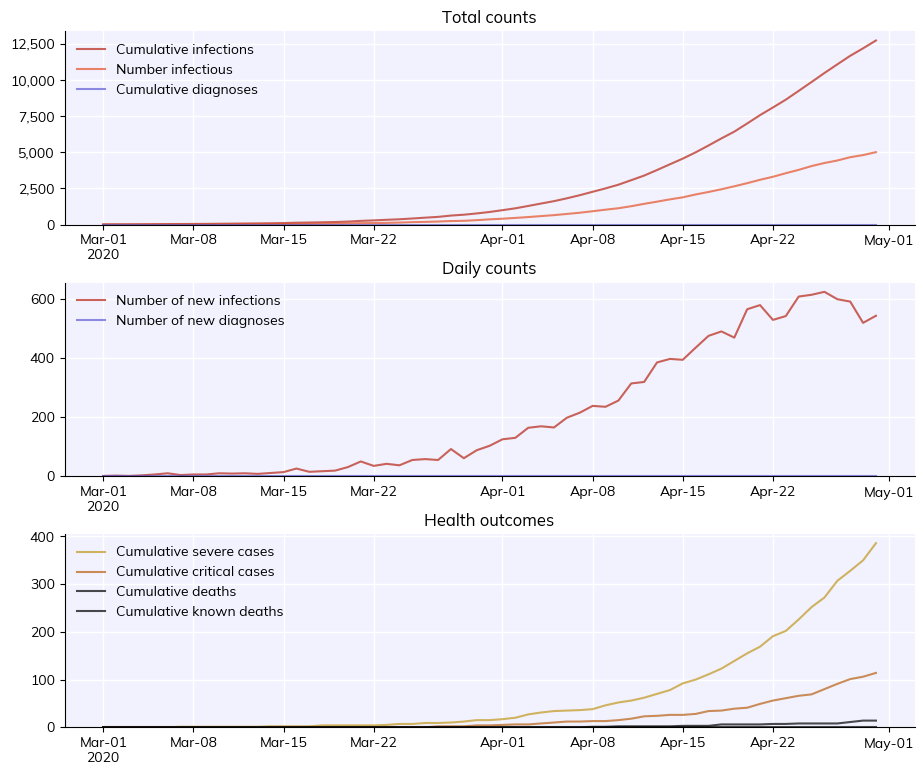
Covasim contains a number of built-in tools to make it easier to keep track of where results came from. The simplest of these is that if you save an image using cv.savefig() instead of pl.savefig(), it will automatically store information about the script and Covasim version that generated it:
[3]:
import covasim as cv
cv.options(jupyter=True, verbose=0)

sim = cv.Sim()
sim.run()
sim.plot()
[4]:
filename = 'my-figure.png'
cv.savefig(filename) # Save including version information
cv.get_png_metadata(filename) # Retrieve and print information
Covasim version: 3.1.7
Covasim branch: Branch N/A
Covasim hash: Hash N/A
Covasim date: Date N/A
Covasim caller branch: Branch N/A
Covasim caller hash: Hash N/A
Covasim caller date: Date N/A
Covasim caller filename: /home/docs/checkouts/readthedocs.org/user_builds/institute-for-disease-modeling-covasim/envs/latest/lib/python3.9/site-packages/covasim/misc.py
Covasim current time: 2026-Mar-18 15:15:09
Covasim calling file: /tmp/ipykernel_2977/2013902684.py
This can be extremely useful for figuring out where that intriguing result you generated 3 weeks ago came from!
This information is also stored in sims and multisims themselves:
[5]:
print(sim.version)
print(sim.git_info)
3.1.7
{'covasim': {'version': '3.1.7', 'branch': 'Branch N/A', 'hash': 'Hash N/A', 'date': 'Date N/A'}, 'called_by': {'branch': 'Branch N/A', 'hash': 'Hash N/A', 'date': 'Date N/A', 'filename': '/tmp/ipykernel_2977/3079231718.py'}}
Finally, the function cv.check_version() and cv.check_save_version() are useful if you want to ensure that users are running the right version of your code. Placing cv.check_save_version('2.0.0') will save a file with the information above to the current folder – again, useful for debugging exactly what changed and when. (You can also provide additional information to it, e.g. to also save the versions of 3rd-party packages you’re importing). cv.check_version() by itself can be
used to provide a warning or even raise an exception (if die=True) if the version is not what’s expected:
[6]:
cv.check_version('1.5.0')
Note: Covasim is newer than expected (3.1.7 vs. 1.5.0)
[6]:
1
Working with dates#
Dates can be tricky to work with. Covasim comes with a number of built-in features to work with dates. By default, by convention Covasim works with dates in the format YYYY-MM-DD, e.g. '2020-12-01'. However, it can handle a wide variety of other date and datetime objects. In particular, sim objects know when they start and end, and can use this to do quite a bit of date math:
[7]:
sim = cv.Sim(start_day='20201122', end_day='2020-12-09 02:14:58.727703')
sim.initialize() # Date conversion happens on initialization
print(sim['start_day'])
print(sim['end_day'])
print(sim.day(sim['end_day'])) # Prints the number of days until the end day, i.e. the length of the sim
2020-11-22
2020-12-09
17
You can also easily calculate the difference between two dates, or generate a range of dates. These are returned as strings by default, but can be converted to datetime objects via Sciris:
[8]:
import sciris as sc

print(cv.daydiff('2020-06-01', '2020-07-01', '2020-08-01'))
dates = cv.date_range('2020-04-04', '2020-04-12')
print(dates)
print(sc.readdate(dates))
[30, 31]
['2020-04-04', '2020-04-05', '2020-04-06', '2020-04-07', '2020-04-08', '2020-04-09', '2020-04-10', '2020-04-11', '2020-04-12']
[datetime.datetime(2020, 4, 4, 0, 0), datetime.datetime(2020, 4, 5, 0, 0), datetime.datetime(2020, 4, 6, 0, 0), datetime.datetime(2020, 4, 7, 0, 0), datetime.datetime(2020, 4, 8, 0, 0), datetime.datetime(2020, 4, 9, 0, 0), datetime.datetime(2020, 4, 10, 0, 0), datetime.datetime(2020, 4, 11, 0, 0), datetime.datetime(2020, 4, 12, 0, 0)]
Finally, one gotcha is that when loading Excel spreadsheets in pandas, dates are loaded in pandas’ internal Timestamp[ns64] format, which nothing else seems to be able to read. If this happens to you, the solution (as far as Covasim is concerned) is to convert to a datetime.date:
data = pd.read_excel(filename)
data['date'] = data['date'].dt.date
Working with dictionaries#
“I already know how to work with dictionaries”, you say. Yes, you do. But there are a couple tricks that might make things easier.
Covasim is built on Sciris, which includes containers odict and objdict. While these are documented elsewhere, a couple examples will serve to illustrate how they work.
An odict is just an ordered dict that you can refer to by position as well as by key. For example:
[9]:
mydict = sc.odict(foo=[1,2,3], bar=[4,5,6]) # Assignment is the same as ordinary dictionaries
print('Entry foo:', mydict['foo'])
print('Entry 0:',    mydict[0]) # Access by key or by index
for i,key,value in mydict.enumitems(): # Additional methods for iteration
    print(f'Item {i} is named {key} and has value {value}')
Entry foo: [1, 2, 3]
Entry 0: [1, 2, 3]
Item 0 is named foo and has value [1, 2, 3]
Item 1 is named bar and has value [4, 5, 6]
An objdict is exactly the same as an odict except it lets you reference keys as if they were attributes:
[10]:
myobjdict = sc.objdict(foo=[1,2,3], bar=[4,5,6])
print('Entry foo:', myobjdict['foo'])
print('Entry 0:',    myobjdict[0]) # Access by key or by index
print('"Attribute" foo:', myobjdict.foo)
Entry foo: [1, 2, 3]
Entry 0: [1, 2, 3]
"Attribute" foo: [1, 2, 3]
Using this approach, you can get all the power and flexibility of dictionaries, while writing code as succinctly as possible. For example:
[11]:
total_pop = 44_483 # This many total people

pars= sc.objdict(
    pop_type = 'hybrid',
    pop_size = 10e3,
)
pars.pop_scale = total_pop/pars.pop_size # Instead of pars['pop_scale'] = total_pop/pars['pop_size']
sim = cv.Sim(**pars) # It's still a dict, so you can treat it as one!
For example, the results object is an objdict. This means that although you can use e.g. sim.results['new_infections'], you can also use sim.results.new_infections.
Finally, Sciris also contains a function called mergedicts. This acts very similarly to dict.update(), with the main difference being that it returns the result of merging the two dictionaries. This is especially useful for handling keyword arguments in functions:
[12]:
def myfunc(args=None, **kwargs):
    defaults = dict(foo=[1,2,3], bar=[4,5,6])
    merged_args = sc.mergedicts(defaults, args, kwargs)
    print(merged_args)

myfunc(args=dict(bar=18), other_args='can be anything')
{'foo': [1, 2, 3], 'bar': 18, 'other_args': 'can be anything'}
As you can see, it merged the default settings, the arguments supplied to the function via the keyword args, and then other keywords, into a single dictionary.